Rhythmically Reactive. Precisely Timed. Wildly Creative.
MIDILLI Configurator gives you a powerful way to build time-based interactions between your buttons, banks, and MIDI messages — all through its Automation system.
This post is part of a quick, yet comprehensive guide (QCG) series by MIDILLI.
🎛 What Is Automation?
In MIDILLI, Automation means triggering predefined sequences of actions in time — either with millisecond-precision intervals or synced to beats per minute (BPM). It allows you to:
- Send MIDI messages
- Change banks
- Trigger notes, CCs, or SysEx
- … all based on button events and tempo-based timing
🔘 Button-Driven Automation
You define what happens when a button is:
- Pressed
- Released
- Toggled
- Triggered (pulse)
- …or both pressed & released (read more on this).
Each of these can start an automation that:
- Sends MIDI messages at timed intervals
- Changes banks after a delay or on a loop
- Triggers sequences across your devices
And it works across all supported protocols: USB, BLE, or MIDI Out.
🕒 Tempo-Aware MIDI Control
Need to sync actions with a groove? Automation supports:
- BPM-based timing: Define steps in beats
- Tap tempo: Assign one or more buttons to set the tempo
- Auto clock generation: Use automation to send a MIDI clock and drive external devices
Perfect for:
- Creating evolving MIDI patterns
- Switching layers in time with your song
- Building tempo-synced control surfaces for live performance
🔄 Example Use Cases
- Press a button → send a Note On, wait 500ms → change bank, send another message
- Use 2 buttons to tap the tempo → automation sequences adjust timing in real time
- Toggle a button to start/stop a clock-generating sequence, or clips
- Trigger evolving MIDI CCs or SysEx commands at rhythmic intervals
🚀 With Automation, MIDILLI becomes more than a device — it becomes a time-based MIDI engine, reactive to performance and smart in timing.
🎚️ Try it out today and bring motion and structure into your MIDI world.
👉 Read the Full Automation Manual
🛠 How to Enable Automation
Getting started with Automation is easy and can be set differently for each bank:
- Select a button inside a bank.
- Define the MIDI action you want (e.g., send CC 90 ranging between 0 and 127).
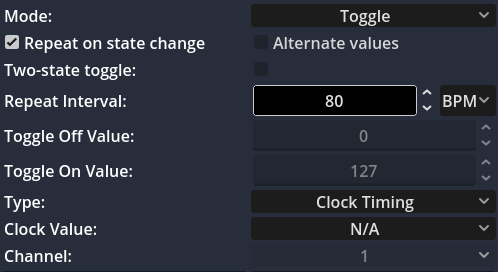
- Check the “Repeat” checkbox to enable automation. You can make it react on Hold or Toggle On, depending on the button mode.
- Set the Repeat Interval, either in milliseconds or beats per minute (BPM).
- Optionally enable “Alternate values” to send both the minimum and maximum value in succession with a single press.
- Do not forget to switch to the original bank if you are using bank change for automation.
⚠️ Tip: Avoid setting the repeat interval too fast to prevent overwhelming the MIDI buffer.
You can also assign a button to tap tempo, allowing real-time tempo control of automations and MIDI clock sync.
📸 Below is a screenshot showing how to set a tempo after button toggled on at 80 BPM:
Want more tips like this?
📩 Subscribe to our newsletter and get controller design ideas, MIDI tricks, and workflow inspiration straight to your inbox. Read our privacy policy.