
This post is all about buttons. Not just any buttons, though. We’re diving into the essential behaviors every MIDI controller should support: Gate, Toggle, and Trigger.
This post is part of a quick, yet comprehensive guide (QCG) series by MIDILLI.
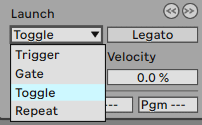
These are not just fancy terms — they define how your buttons react when you play. And even if your MIDI hardware doesn’t support them natively, most DAWs do! For example, in Ableton Live, you can find these under Clip > Launch Settings. Just choose whether a clip launches in gate, toggle, or trigger mode — all without touching your hardware. See it below:
How about Repeat? That’s a whole different story, and we’ve got that covered too. But let’s save it for another update.
At MIDILLI, we prioritize flexibility and ease of use. That’s why we support multiple button modes to match how you want to perform, program, or automate your MIDI workflows using our MIDI Controllers.

Let’s break down the three essential modes:
🕹️ Gate Mode
Press = Sends the “pressed value”
Release = Sends the “released value”
Ideal for real-time controls like holding a note, muting channels while pressed, or engaging effects momentarily.
🔁 Toggle Mode
Each press switches between two values.
First press = Sends the “on” value
Second press = Sends the “off” value
Perfect for on/off controls — think solo buttons, arm tracks, or enabling effects.
⚡ Trigger Mode
Sends a “pressed” value once when pressed.
Releasing the button does nothing.
Use it for actions that require a one-shot trigger, like launching samples, switching presets, tap tempo or sending control messages — without needing to track button release.
🧠 Use the Right Tool for the Right Task
Each mode fits a different use case. Need real-time response? Go with Gate.
Want toggle behavior? That’s exactly what Toggle mode is for.
Need a fire-and-forget trigger? You guessed it — Trigger’s your friend.
See yourself how you can configure your buttons in the Configurator for different scenarios by clicking here.
These behaviours can be automated, but this is the part of another update!
Stay tuned!
Want more tips like this?
📩 Subscribe to our newsletter and get controller design ideas, MIDI tricks, and workflow inspiration straight to your inbox. Read our privacy policy.